Frequently Asked Questions
Here you can find the answers to most frequently asked questions about the work of
the Virtual Academia.
For more detailed information go to "Reference" section.
For more detailed information go to "Reference" section.
-
FAQ on the site
- I would like to conduct a class or several classes. How do I do it?
- How do I start the class that I have created?
- I would like to attend someone else’s class. What should I do?
- Some menu bars contain inactive buttons. How can I make them active?
- I have questions or experience certain problems concerning the work of the site.
-
Graphics
- The vAcademia client application is very slow on my computer. What do I do?
- How can I update drivers for my video card?
- Where can I find information about the model and manufacturer of my video card?
- Can I increase graphics memory of my Intel integrated video card?
- I see blurry images on presentation screens. What can I do to solve this problem?
- Sound and voice communication
- Area/application/webcam/video sharing
- Resource collection
-
User 3D-objects
- What are the supported formats 3D-models? Which 3D-editors can I use to export my models in the world.
- Where can I find free 3D-models to use it in my classes?
- Are there any limitations for 3D models?
- How to insert a user 3D-model in the world?
- How to change settings of the uploaded 3D-model?
- How to change the settings of the uploaded 3D-model so that every copy of the model is placed in the world with changed properties?
- I picked the wrong collision type when uploading a 3D-model. What I am to do?
- I preset the wrong size of the object when uploading my 3D-model. What am I to do?
- Are interactive properties of 3D-objects available in virtcast mode initiated by a viewer?
- I downloaded/created 3D-model for 3dsmax. How can I paste it into the world?
- Can I create my permanent classroom from user objects?
- Can I define behavior of user objects programmatically?
-
Video playback on the whiteboard
- How to get confidence that the video playback works with my computer completely correct?
- I can't hear sound from the video. What to do?
- My colleagues do not hear sound when I play video
- When I play video through the video viewer everything is fine, but when playing video Virtual Academy the error is the lack of codecs or video without sound is played. Why and what to do?
- How to give help to developers?
Go to “I teach” section and find a subsection “Classes” or “Courses” .
Click on “Add class” or “Add course”, follow the instructions and submit the required
information about the class or the course.
After creating your class or course you can invite the users of the site to enroll
to your class or course.
Find the class you created in “I teach” section and click on
“Watch in world” button. You will easily get to your classroom.
There should be vAcademia client software installed on your computer.
If you have less than 20 minutes before the beginning of the class
and the students enrolled are already there you may start recording.
Open classes can be found under “Classes” and “Courses” subsections.
Use “Soon” and “Now” tabs to find the class you would like to attend and enroll
on it (if the class is a part of the course then enrolling on one class will
automatically enroll you on the whole course).
If the time left before the beginning of the class is less than 20 minutes then
you can go straight into the virtual classroom without enrollment.
vAcademia client software should be installed on your computer.
Otherwise you will have to download and install vAcademia client software first.
These inactive buttons mean that certain functional opportunities are still under construction.
We are working day and night to make these functions active in vAcademia available as soon
as possible.
You can always contact us by filling in the form in the “Feedback” section at the bottom
of every page of the site.
Possible reasons and solutions:
- Make sure the other running applications do not use to many of CPU resources. To check the availability of resources press Ctrl+Alt+Esc and find the Processes tab in the Task Manager window.
- Close all the running applications.
- Update your video card drivers.
- Try lowering the graphics quality in vAcademia Settings dialog Graphics tab.
- Choose a smaller size application window in vAcademia Settings dialog Graphics tab.
- If your notebook supports NVidia Optimus, vAcademia may be started by using the integrated Intel graphics card and high-performance graphics card NVidia is not used. You can see step by step illustrated instructions to correct the problem in section "Problem with NVidia Optimus technology".
For some video cards you can use the following links in your browser.
But it depends on the video card manufacturer:
To find information about the model and manufacturer of your video card you can use GPU Caps Viewer
program which is available from
"http://www.ozone3d.net/gpu_caps_viewer/".
Under the first bookmark in Renderer field you will find the information about the manufacturer
and the model of your video card.
Yes, of course. There is a special FAQ for that.
This problem is common for Intel video cards. Please, right-click on the desktop and select "Graphic properties".
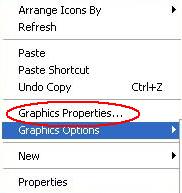
Set texture quality settings as shown at picture.
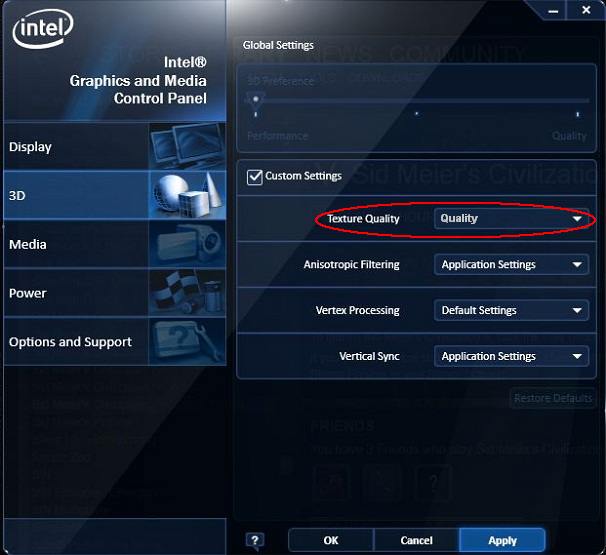
After that you must run vAcademia again.

Set texture quality settings as shown at picture.

After that you must run vAcademia again.
You can hear the visitors from only your location. If you are outside any locations on the island
then you can hear only those visitors who are also outside other locations.
You can’t hear visitors who are over 100 meters away from your avatar.
Make sure you are using the proper audio device for playing sound.
Virtual Academia uses a default device.
Shift the sensitivity of the microphone to the extreme right position in the vAcademia
Setting dialog “Sound” tab.
To guarantee the best quality of the sound you should hold your microphone no closer
than 10 centimeters away from your lips.
Possible solutions:
- The image capture and processing requires a lot of resources. Try the algorithm described as “The vAcademia client application is very slow on my computer”.
- Your computer load and the network traffic depend on the size of the shared area. Try reducing the size of the shared area.
Make sure that the internet band is free.
If you have any downloading files, stop the downloads for a period of the session.
Ask your colleagues to do the same.
When sharing your screen the preview window contains the quality slider box. Move it to the left side. If you are showing black and white image the quality will remain rather good at 30-35%. When displaying plain black text the slider box may be moved to 10-20%. Set the sliderbox to 20-35% for the colour text.
Your computer load and the amount of traffic transferred depend on the size of the displayed area. Try reducing the size of the window or the area you are showing.
Make sure the webcam is not used by another application. If that is the case, close this application.
Make sure webcam is present in "My computer" window of the explorer window. If computer doesn’t see your webcam try to reconnect the USB cable of the device.
Reinstall webcam drivers from a CD.
Make sure webcam is present in "My computer" window of the explorer window. If computer doesn’t see your webcam try to reconnect the USB cable of the device.
Reinstall webcam drivers from a CD.
You can upload any files into the collection.
The maximum amount of resource collection is 10 megabytes per class.
The uploaded files can be downloaded by other visitors if they are authorized to do so.
Some files may be displayed on the interactive boards during the class.
To do so you should select the file by mouse cursor, press and hold down the left mouse button,
drag it onto the board and drop it there.
Interactive boards may display the following types of files:
- images - jpg, png
- presentations - ppt, pptx
- documents - pdf
The files uploaded into the collection to the class are available for those students
who have access to that class.
The files uploaded to any other folder outside the collection are available only for the person who uploaded it.
The files uploaded to any other folder outside the collection are available only for the person who uploaded it.
Collada ,3DS, OBJ and SketchUP (SKP) are currently supported.
You'll be able to export 3D models without additional plugins from 3dsmax, Maya, Blender into 3DS and OBJ formats.
Exporting from 3dsmax and Maya into Collada can be done using plugins ColladaMax и ColladaMaya respectively. Without additional plugins the Blender exports models into Collada format with numerous simplifications and bugs. Setting up plugins such as for example Collada Plugin from Illusoft can lead to a more correct export in Collada.
A lot of free 3Dmodels in Collada an SketchUp formats are available from Google 3DwareHouse library.
You can download 3D models in 3SD and OBJ formats from a number of internet libraries, for example, http://www.all3dmodel.com or buy a collection of models on a disk. Please note that a model is often provided without textures (there are no texture files attached) In this case the model will be displayed in grey.
You can download 3D models in 3SD and OBJ formats from a number of internet libraries, for example, http://www.all3dmodel.com or buy a collection of models on a disk. Please note that a model is often provided without textures (there are no texture files attached) In this case the model will be displayed in grey.
The uploaded model can contain up to 50000 polygons and up to 12 textures. Altogether user objects within one location can't have summarily over 50000 polygons, regardless of the number of objects.
When calculating polygons the non-user allocated objects are not considered.
Object placement is also available in "My home" location. User objects located here can contain summarily up to 100000 polygons altogether.
Placing 3D user models is possible inside temporary locations and locations within preplanned classes. When delivering spontaneous or unplanned classes it is not possible to place 3D user objects.
Convert your 3D model to Collada, 3DS, OBJ or SKP format and zip it together with textures. If there are no
textures please upload a dae-file (a 3ds-file, obj-file, SKP-file) of the model instead of zip archive.
Open collection of resources.

Select "upload a file".
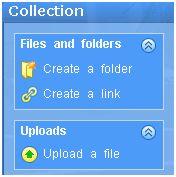
Select your file and wait for uploading to finish. If no errors occur a window will pop up to setup the model after export.
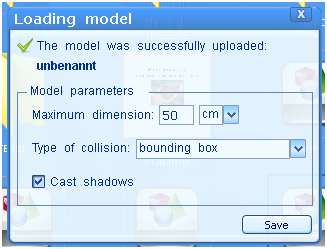
After that a 3D model icon will be displayed in the collection of resources.
Drag your 3D model from the collection of resources to a certain place in the world in the temporary location (your avatar must be within this temporary location as well) or at the location of the class. Your 3D model will be added to the world.
Open collection of resources.

Select "upload a file".

Select your file and wait for uploading to finish. If no errors occur a window will pop up to setup the model after export.

After that a 3D model icon will be displayed in the collection of resources.

Drag your 3D model from the collection of resources to a certain place in the world in the temporary location (your avatar must be within this temporary location as well) or at the location of the class. Your 3D model will be added to the world.
Place an object in the pop up window of object positioning and select the property icon.

Change the setting in the pop up window of object properties the way you wish.

Change the setting in the pop up window of object properties the way you wish.
Place an object, change settings and all copies of the object positioned in the world hereafter will
feature the desired properties. Objects placed earlier will retain their original properties.
Please consider that change of texture (not on click event) is applicable to one copy of the object only. New objects will be appeared in the world regardless of texture change.
Please consider that change of texture (not on click event) is applicable to one copy of the object only. New objects will be appeared in the world regardless of texture change.
Delete your model from the collection of resources and upload it again.
Place your object and use scaling.


Text display, URL opening, teleport to a certain place of the world and into the virtcast are
available during the whole virtcast.
Playing sound is available during pause and for your computer only.
No other interactive properties are available.
Playing sound is available during pause and for your computer only.
No other interactive properties are available.
Option 1:
1. Open your model in 3dsmax.
2. Select File->Export in the menu bar and choose *.3DS format file.
3. 3dsmax will export 3dmodel into 3DS-file. Add here texture files (PNG, JPG, etc) and add all these files into one zip-archive (the structure of folders is not important).
4. Further you can use this archive as if you have downloaded a model in Collada format.
Second option:
1. Download and setup ColladaMax plugin. Click here to get a suitable version for 32-bit 3ds MAX 7, 8, 9, 2008 and 2009.
2. After setting up a plugin select File->Export in the menu bar and pick COLLADA (*.DAE) as a file type.
3. 3dsmax will export a 3d-model into DAE-file. Place the texture files (PNG, JPG, etc) nearby and compress these files into one zip-archive (the structure of folders it not important).
4. You can use this archive as if you downloaded a model in Collada format.
Yes, you can. To do it please use "my home" location. Only you are authorized to delete contents from this location. To go to "my home" location click on

You can run the preplanned classes in "my home" location or invite other users to visit this location.


You can run the preplanned classes in "my home" location or invite other users to visit this location.

Yes, of course. You can use vJS language for it. Full description of vJS (in Russian only) you can find here.
Make sure that colleagues see the video and hear the sound.
Make sure you are using the proper audio device for playing sound. Virtual Academia uses a default device.
Check that on the sound capturing tab of the vAcademia Setting dialog "Microphone" selected device is "Stereo Mixer"
vAcademia uses the video codecs installed in your system. Some video players contain part of codecs inside that helps in the absence of video codecs in your system. We recommend to reinstall video codecs with default parameters. You can download the codecs from here.
Sometimes developers need to get vAcademia logs to manage problems faster.
vAcademia log is a text file. One text file corresponds to one program run. If you get a
letter from developers requesting to send logs, you can easily find them using the
following path:
In Windows XP: C:\Documents and Settings\USER_NAME\Application Data\VacademiaLog\
In Windows Vista or Windows 7: C:\Users\USER_NAME\AppData\Roaming\VacademiaLog\
Instead of USER_NAME type in your username (login) used in Windows. If Windows isn't installed on C disk, you'll have to replace disk C in log path into the disk on which Windows is installed.
